Embedding an Applet in a Web Application

An applet is a small task-focused application that runs within a larger application or program. On the web, applets are often written in Java and inserted into webpages to provide some specific functionality.
This tutorial guides you to develop a Java Applet and embed that applet in a Web Application to make it visible on a website. I’ll be using the following technologies:
- NetBeansIDE 7.3
- Java 1.7
- JSP (Java Server Pages)
- Apache Tomcat Server
Key Takeaways
- Utilize NetBeans IDE and Apache Tomcat to develop and embed Java applets into web applications, enhancing the functionality of web pages.
- Follow a step-by-step process in NetBeans IDE for creating a Java applet and a web application, and then integrate the applet into the web application using JSP.
- Understand the security implications of using applets, including differences between unsigned, self-signed, and signed applets, and the necessary steps to run them in modern browsers.
- Use the `
- Ensure that the Java Runtime Environment (JRE) is installed on client machines and that browsers are configured to support applets, addressing common issues such as applet visibility and interaction with web technologies.
Introduction
Before starting with this informative tutorial, I would like to give some introduction about the Technologies that will be covered:
- NetBeansIDE: It is an Integrated Development Environment developed by Oracle Corporation in Java. It can run on Windows, Linux, Solaris and other platforms which support compatible Java Virtual Machine (JVM).
- Java: It is a programming language developed by James Gosling in 1995 which derives its syntax from C and C++.
- Applet: It is basically a program written to run on Web Page. Controls like button, label, checkbox, textfield etc can be created and mouse inputs can also be captured.
- Web Application: The client used by a Web Application is Web Browser. It mainly uses a combination of server side script(JSP, ASP) and client side scripting(HTML, JavaScript)
- JSP (Java Server Pages): JSP is used to develop dynamically generated web pages. The Applet will be embedded in JSP page.
- Apache Tomcat Server: It is an open source Web Server which implements JSP and Java Servlet specifications.
Developing and Running Applet in Java Application
Follow these simple steps to create an Applet in Java Application using NetBeansIDE:
Open NetBeansIDE project from File -> NewProject -> ChooseProject -> Java Application as shown below:
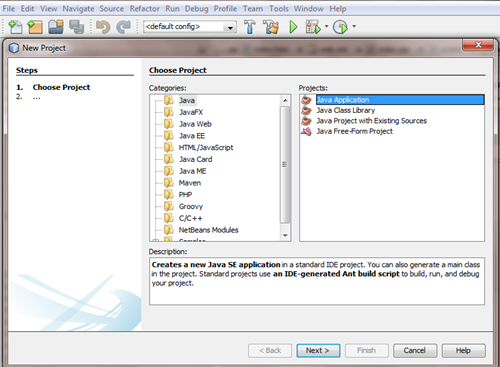
Figure 1: New Java Application
Now, add Project Name, Project Location:
Project Name: AmitJavaApplication
Project Location: C:\Users\amit\Documents\NetBeansProjects
Main Class: amitjavaapplication.AmitJavaApplication
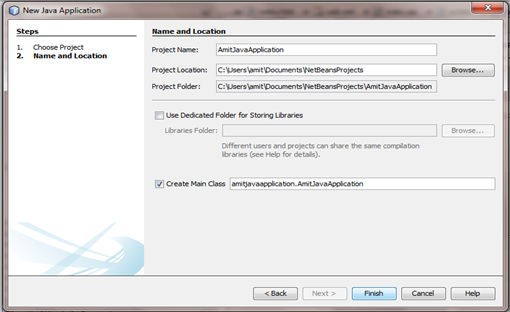
Figure 2: Project Name as AmitJavaApplication
The following code gets generated when you click on “Finish”, here:
Package: amitjavaapplication
Main Class: amitjavaapplication.AmitJavaApplication
/*

 * To change this template, choose Tools | Templates

 * and open the template in the editor.

 */

package amitjavaapplication;
/**

 *

 * @author amit

 */

public class AmitJavaApplication {
    /**

     * @param args the command line arguments

     */

    public static void main(String[] args) {

        // TODO code application logic here

    }

}
The directory structure can be seen here on the left panel under Tab “Projects” and “Files”:
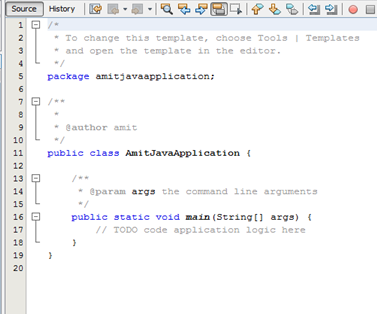
Figure 3: AmitJavaApplication.java code
To create an Applet follow these steps:
Right-Click on AmitJavaApplication->New->Other
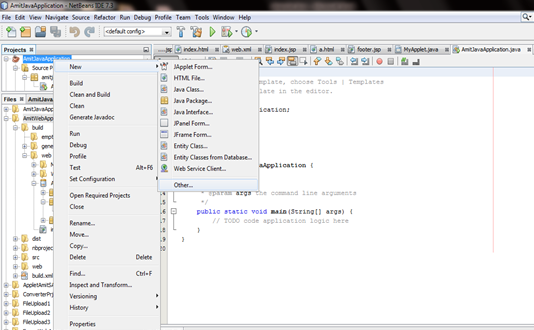
Figure 4: Steps to create new Applet
Select Swing GUI form->JAppletForm, click on Next as shown below:
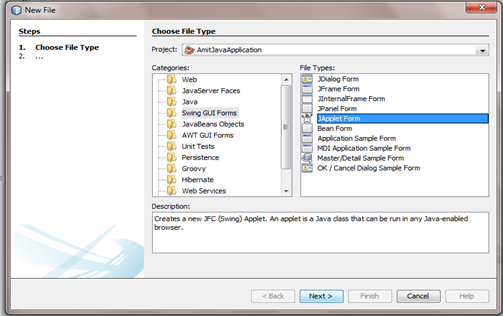
Figure 5: Select ”JApplet Form” from Swing GUI Forms
After completing the above step, enter the following:
Class Name: AmitApplet
Package: tutorial.me
The file gets created under the “tutorial.me” package at the following location:
File Location: C:\Users\amit\Documents\NetBeansProjects\AmitJavaApplication\src\tutorial\me
After this click on Finish:
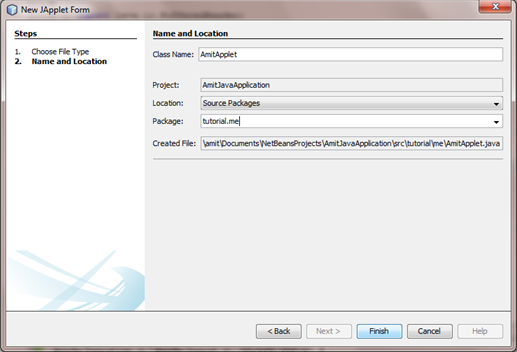
Figure 6: Set Class Name and Package
Now, the Design screen of “AmitApplet.java” can be seen here. It comes with an option “Palette” to add any Swing Container/Control to the Applet:
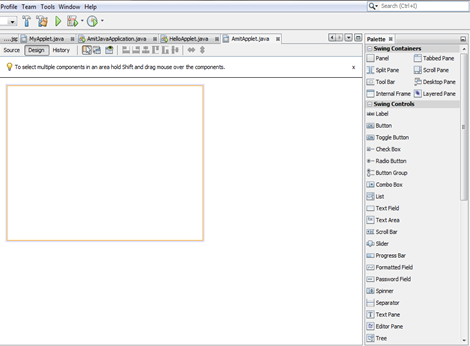
Figure 7: Design part of Applet Class
Designing of Applet is shown below with the following Swing Container and Controls:
| Swing Container/ Control | Number | Variable Name |
| JPanel (Container) | 1 | jPanel1 |
| JLabel (Control) | 1 | jLabel1 |
| JTextField (Control) | 3 | textNum1 textNum2 textResult |
| JButton (Control) | 1 | btnMultiply |
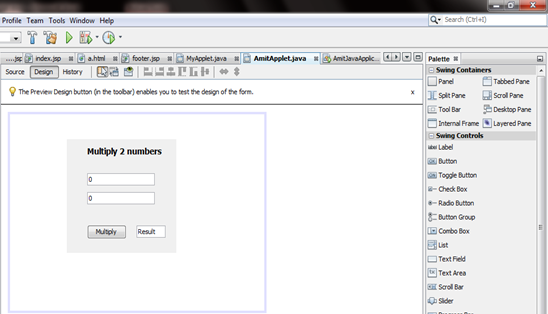
Figure 8: Applet Designed to multiply 2 numbers
The following code can be seen under “Source Editor” when “Design” gets completed, screenshot and code of Applet Application is shown below:
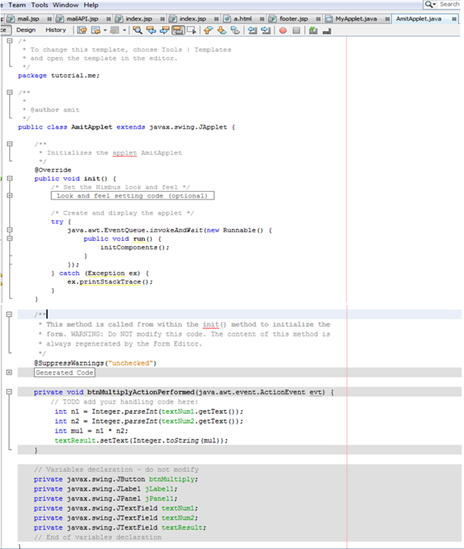
Figure 9: Code Screenshot
The full code is provided here:
/*

 * To change this template, choose Tools | Templates

 * and open the template in the editor.

 */

package tutorial.me;
/**

 *

 * @author amit

 */

public class AmitApplet extends javax.swing.JApplet {
    /**

     * Initializes the applet AmitApplet

     */

    @Override

    public void init() {

        /* Set the Nimbus look and feel */

        //<editor-fold defaultstate="collapsed" desc=" Look and feel setting code (optional) ">

        /* If Nimbus (introduced in Java SE 6) is not available, stay with the default look and feel.

         * For details see http://download.oracle.com/javase/tutorial/uiswing/lookandfeel/plaf.html

         */

        try {

            for (javax.swing.UIManager.LookAndFeelInfo info : javax.swing.UIManager.getInstalledLookAndFeels()) {

                if ("Nimbus".equals(info.getName())) {

                    javax.swing.UIManager.setLookAndFeel(info.getClassName());

                    break;

                }

            }

        } catch (ClassNotFoundException ex) {

            java.util.logging.Logger.getLogger(AmitApplet.class.getName()).log(java.util.logging.Level.SEVERE, null, ex);

        } catch (InstantiationException ex) {

            java.util.logging.Logger.getLogger(AmitApplet.class.getName()).log(java.util.logging.Level.SEVERE, null, ex);

        } catch (IllegalAccessException ex) {

            java.util.logging.Logger.getLogger(AmitApplet.class.getName()).log(java.util.logging.Level.SEVERE, null, ex);

        } catch (javax.swing.UnsupportedLookAndFeelException ex) {

            java.util.logging.Logger.getLogger(AmitApplet.class.getName()).log(java.util.logging.Level.SEVERE, null, ex);

        }

        //</editor-fold>
        /* Create and display the applet */

        try {

            java.awt.EventQueue.invokeAndWait(new Runnable() {

                public void run() {

                    initComponents();

                }

            });

        } catch (Exception ex) {

            ex.printStackTrace();

        }

    }
    /**

     * This method is called from within the init() method to initialize the

     * form. WARNING: Do NOT modify this code. The content of this method is

     * always regenerated by the Form Editor.

     */

    @SuppressWarnings("unchecked")

    // <editor-fold defaultstate="collapsed" desc="Generated Code">

    private void initComponents() {
        jPanel1 = new javax.swing.JPanel();

        jLabel1 = new javax.swing.JLabel();

        textNum1 = new javax.swing.JTextField();

        textNum2 = new javax.swing.JTextField();

        btnMultiply = new javax.swing.JButton();

        textResult = new javax.swing.JTextField();
        jLabel1.setFont(new java.awt.Font("Tahoma", 1, 14)); // NOI18N

        jLabel1.setText("Multiply 2 numbers");
        textNum1.setText("0");
        textNum2.setText("0");
        btnMultiply.setText("Multiply");

        btnMultiply.addActionListener(new java.awt.event.ActionListener() {

            public void actionPerformed(java.awt.event.ActionEvent evt) {

                btnMultiplyActionPerformed(evt);

            }

        });
        textResult.setText("Result");
        javax.swing.GroupLayout jPanel1Layout = new javax.swing.GroupLayout(jPanel1);

        jPanel1.setLayout(jPanel1Layout);

        jPanel1Layout.setHorizontalGroup(

            jPanel1Layout.createParallelGroup(javax.swing.GroupLayout.Alignment.LEADING)

            .addGroup(javax.swing.GroupLayout.Alignment.TRAILING, jPanel1Layout.createSequentialGroup()

                .addGap(0, 36, Short.MAX_VALUE)

                .addGroup(jPanel1Layout.createParallelGroup(javax.swing.GroupLayout.Alignment.LEADING)

                    .addComponent(jLabel1, javax.swing.GroupLayout.PREFERRED_SIZE, 138, javax.swing.GroupLayout.PREFERRED_SIZE)

                    .addComponent(textNum2, javax.swing.GroupLayout.PREFERRED_SIZE, 119, javax.swing.GroupLayout.PREFERRED_SIZE)

                    .addComponent(textNum1, javax.swing.GroupLayout.PREFERRED_SIZE, 119, javax.swing.GroupLayout.PREFERRED_SIZE)

                    .addGroup(jPanel1Layout.createSequentialGroup()

                        .addComponent(btnMultiply)

                        .addGap(18, 18, 18)

                        .addComponent(textResult, javax.swing.GroupLayout.PREFERRED_SIZE, 51, javax.swing.GroupLayout.PREFERRED_SIZE)))

                .addGap(19, 19, 19))

        );

        jPanel1Layout.setVerticalGroup(

            jPanel1Layout.createParallelGroup(javax.swing.GroupLayout.Alignment.LEADING)

            .addGroup(jPanel1Layout.createSequentialGroup()

                .addContainerGap()

                .addComponent(jLabel1)

                .addGap(28, 28, 28)

                .addComponent(textNum1, javax.swing.GroupLayout.PREFERRED_SIZE, javax.swing.GroupLayout.DEFAULT_SIZE,                     javax.swing.GroupLayout.PREFERRED_SIZE)

                .addPreferredGap(javax.swing.LayoutStyle.ComponentPlacement.UNRELATED)

                .addComponent(textNum2, javax.swing.GroupLayout.PREFERRED_SIZE, javax.swing.GroupLayout.DEFAULT_SIZE, javax.swing.GroupLayout.PREFERRED_SIZE)

                .addPreferredGap(javax.swing.LayoutStyle.ComponentPlacement.RELATED, 34, Short.MAX_VALUE)

                .addGroup(jPanel1Layout.createParallelGroup(javax.swing.GroupLayout.Alignment.BASELINE)

                    .addComponent(btnMultiply)

                    .addComponent(textResult, javax.swing.GroupLayout.PREFERRED_SIZE, javax.swing.GroupLayout.DEFAULT_SIZE, javax.swing.GroupLayout.PREFERRED_SIZE))

                .addGap(23, 23, 23))

        );
        javax.swing.GroupLayout layout = new javax.swing.GroupLayout(getContentPane());

        getContentPane().setLayout(layout);

        layout.setHorizontalGroup(

            layout.createParallelGroup(javax.swing.GroupLayout.Alignment.LEADING)

            .addGroup(layout.createSequentialGroup()

                .addGap(100, 100, 100)

                .addComponent(jPanel1, javax.swing.GroupLayout.PREFERRED_SIZE, javax.swing.GroupLayout.DEFAULT_SIZE, javax.swing.GroupLayout.PREFERRED_SIZE)

                .addContainerGap(155, Short.MAX_VALUE))

        );

        layout.setVerticalGroup(

            layout.createParallelGroup(javax.swing.GroupLayout.Alignment.LEADING)

            .addGroup(layout.createSequentialGroup()

                .addGap(41, 41, 41)

                .addComponent(jPanel1, javax.swing.GroupLayout.PREFERRED_SIZE, javax.swing.GroupLayout.DEFAULT_SIZE, javax.swing.GroupLayout.PREFERRED_SIZE)

                .addContainerGap(95, Short.MAX_VALUE))

        );

    }// </editor-fold>
    private void btnMultiplyActionPerformed(java.awt.event.ActionEvent evt) {

        // TODO add your handling code here:

         int n1 = Integer.parseInt(textNum1.getText());

         int n2 = Integer.parseInt(textNum2.getText());

         int mul = n1 * n2;

         textResult.setText(Integer.toString(mul));

    }
    // Variables declaration - do not modify

    private javax.swing.JButton btnMultiply;

    private javax.swing.JLabel jLabel1;

    private javax.swing.JPanel jPanel1;

    private javax.swing.JTextField textNum1;

    private javax.swing.JTextField textNum2;

    private javax.swing.JTextField textResult;

    // End of variables declaration

}
Now, run the Applet by Right-Clicking on AmitApplet.java->Run File as shown below:
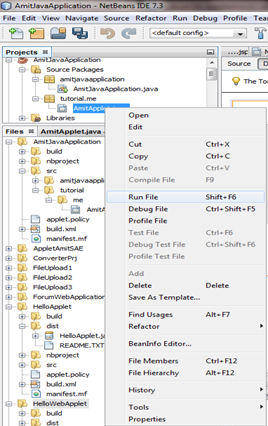
Figure 10: Run Applet “AmitApplet.java”
The Applet can be seen here after completing the above given steps, now enter the following values to multiply i.e.
9 * 7 = 63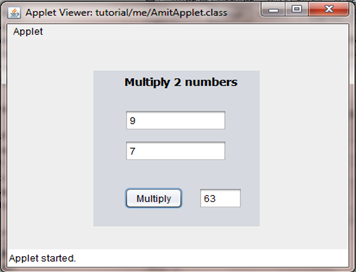
Figure 11: Applet Viewer
The above steps should be followed to run an Applet in NetBeansIDE.
Developing and Running Web Application:
Follow these simple steps to create Web Application using NetBeansIDE:
Go to File->New Project as shown below:
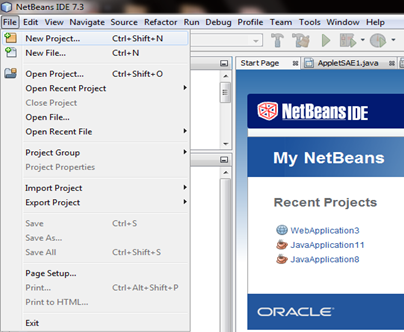
Figure 12: Create new WebApplication project
After starting with New Project, select Java Web from Categories. Now select Web Application and click Next:

Figure 13: Select Web Application from Category “Java Web”
After completing above step, add ProjectName, Project Location:
Project Name: AmitWebApplication
Project Location: C:\Users\amit\Documents\NetBeansProjects
Now, click on Next:
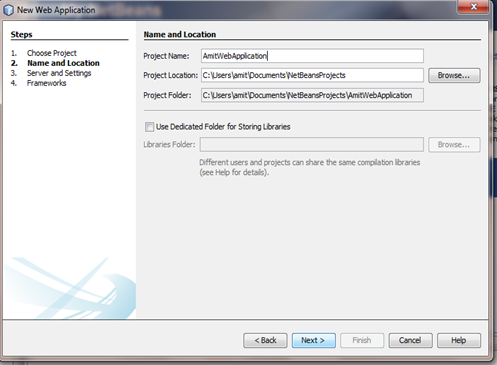
Figure 14: Project Name as “AmitWebApplication”
Select Server from “Server and Settings” and Apache Tomcat to run AmitWebApplication.
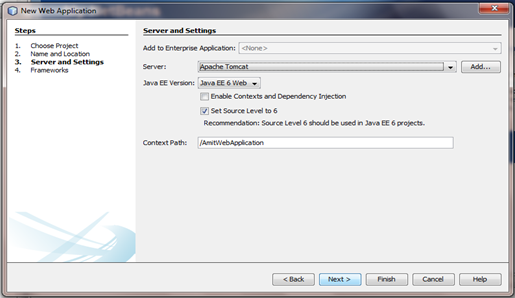
Figure 15: Select Server as Apache Tomcat
Click on Next to start the WebApplication project. It will generate “index.jsp” file with the following code:
<%--

    Document   : index

    Created on : Nov 6, 2013, 10:46:24 AM

    Author     : amit

--%>
<%@page contentType="text/html" pageEncoding="UTF-8"%>

<!DOCTYPE html>

<html>

    <head>

        <meta http-equiv="Content-Type" content="text/html;

        charset=UTF-8">

        <title>JSP Page</title>

    </head>

    <body>

        <h1>Hello World!</h1>

     </body>

              </html>
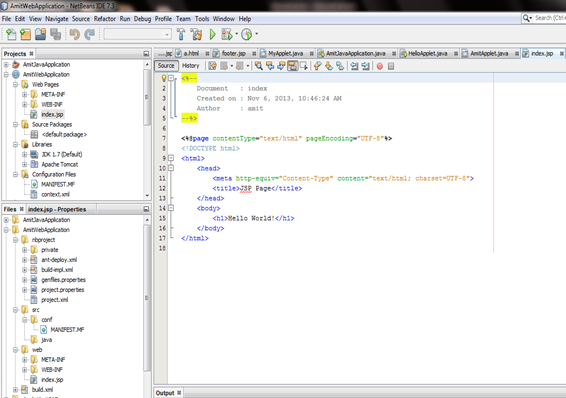
Figure 16: index.jsp
Now run the Web Application by Right-Clicking AmitWebApplication -> Clean and Build as shown below:
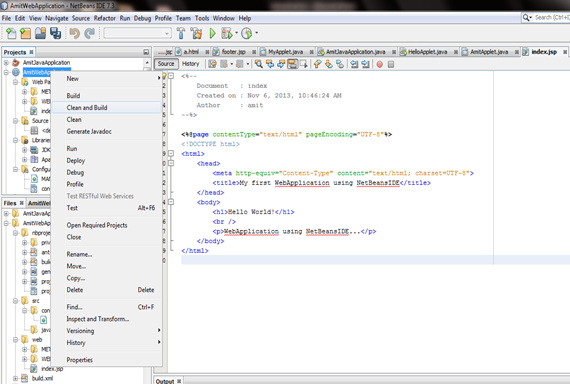
Figure 17: Build AmitWebApplication project
Now after Building Project as shown above, Run Project by using Function Key “F6” or using the following as shown in the below given screenshot:
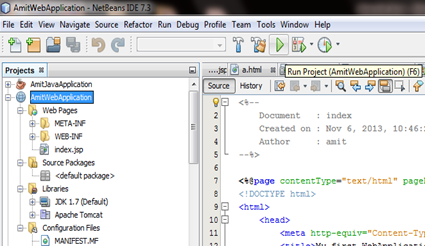
Figure 18: run project
The project will successfully run on localhost i.e. under below stated Address in Google Chrome(you can consider any other browser):
localhost:8080/AmitWebApplication/index.jspThe following screenshot shows the successful running of our Web Application:
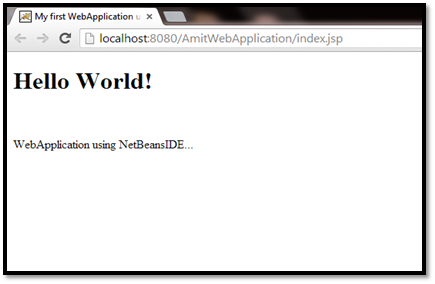
Figure 19: index.jsp running on localhost
The above steps should be followed to run WebApplication in NetBeansIDE.
Embedding/Integration of Applet in the Web Application
Follow these simple steps to integrate an Applet in WebApplication using NetBeansIDE:
RightClick AmitWebApplication->Properties
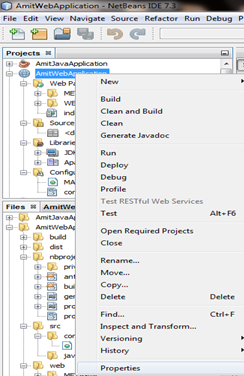
Figure 20: Project Properties
The “Project Properties” dialog box will open.
Select Packaging from “Categories” and then click “Add project”.
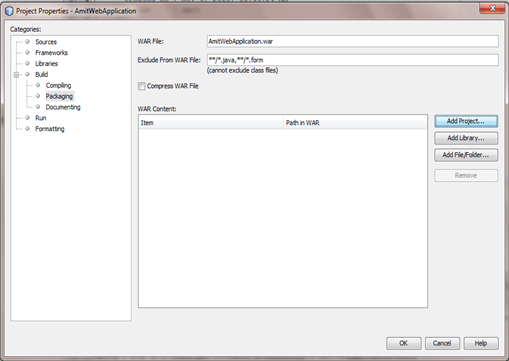
Figure 21: Go to Packaging under Categories and Click “Add Project”
A list of projects developed in NetBeansIDE will be shown. Just select the one which you want to add, here we will add the “AmitJavaApplication” project.
On adding “AmitJavaApplication”, it will itself add the selected Project jar file i.e. “AmitJavaApplication.jar” as shown in the below given screenshot. After that click on the “Add Project JAR Files” Button:
Note: The “AmitJavaApplication” jar file will be visible only if the project “AmitJavaApplication” was built.
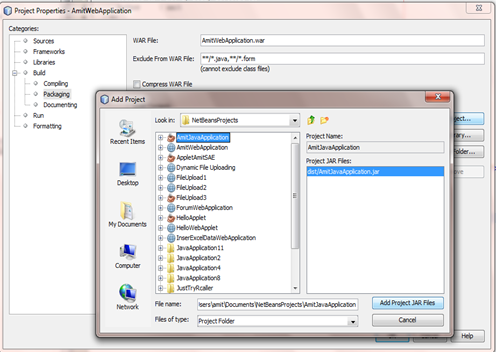
Figure 22: Navigate to AmitJavaApplication Project
After adding the jar file, click OK and just wait for some seconds till the jar file gets added to project. The process is illustrated below. Then press “OK”:
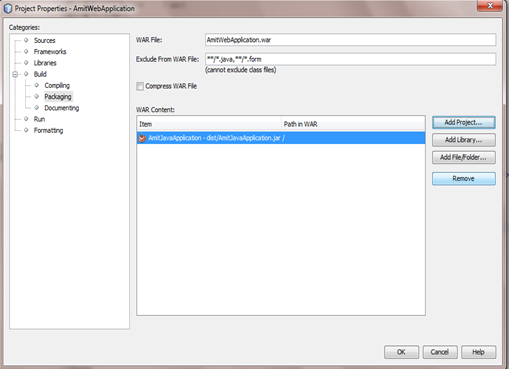
Figure 23: jar file added to project
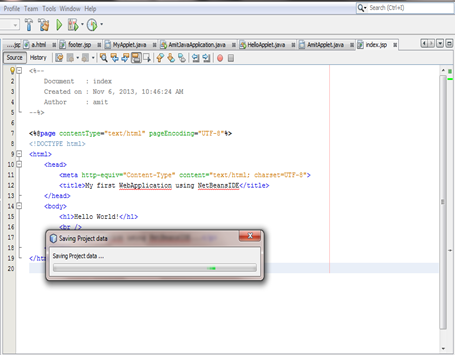
Figure 24: Integration of Applet in WebApplication
The “jar” file gets added to the project which can be seen under directory structure of the “AmitWebApplication” project. The build/web folder shows the addition of jar file:
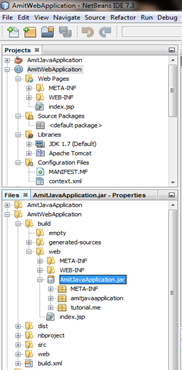
Figure 25: Directory structure showing addition of jar file in AmitWebApplication Project
The Applet is embedded here using the applet tag:
<applet code="tutorial.me.AmitApplet" archive="AmitJavaApplication.jar" width="400" height="350">

</applet>
Here,
| Applet Attribute | Description | Usage in Project |
| Code | specifies file name | tutorial.me.AmitApplet |
| Archive | specifies location of archive file(jar file here) | AmitJavaApplication.jar |
| height | Specifies applet height | 350 |
| width | specifies applet width | 400 |
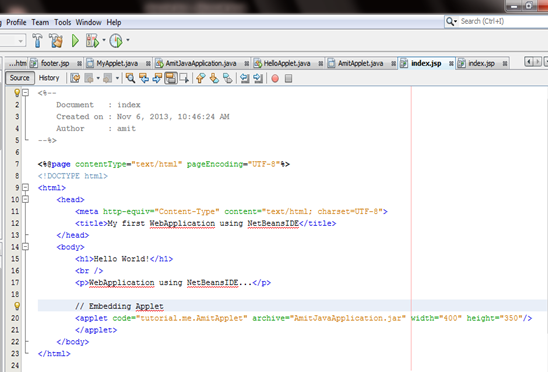
Figure 26: added code to run applet in index.jsp
Code:
<%--

    Document   : index

    Created on : Nov 6, 2013, 10:46:24 AM

    Author     : amit

--%>
<%@page contentType="text/html" pageEncoding="UTF-8"%>

<!DOCTYPE html>

<html>

    <head>

        <meta http-equiv="Content-Type" content="text/html; charset=UTF-8">

        <title>My first WebApplication using NetBeansIDE</title>

    </head>

    <body>

        <h1>Hello World!</h1>

        <br />

        <p>WebApplication using NetBeansIDE...</p>
        <!-- Embedding Applet -->

        <applet code="tutorial.me.AmitApplet" archive="AmitJavaApplication.jar"

        width="400" height="350">

        </applet>

    </body>

             </html>
Now run the Web Application project by with Right-Click -> AmitWebApplication ->Clean and Build as shown below:

Figure 27: Build AmitWebApplication
The project “Builds successfully” which can be seen here in the Output window:
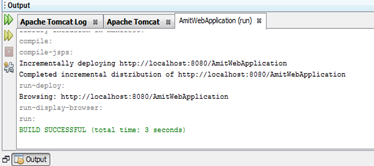
Figure 28: Build Successful
Now after Building Project as shown above, run the Project by using Function Key F6 or as illustrated below:
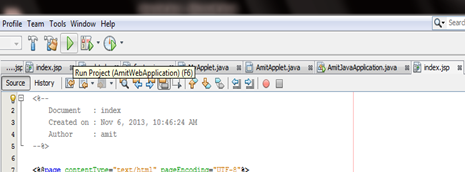
Figure 29: Run Project
The project will successfully run on localhost i.e. under below stated Address in Google Chrome(you can consider any other browser):
localhost:8080/AmitWebApplication/index.jspNow, the below shown Security Warning will appear as applet is unsigned:
“Oracle introduced new security features to its Java web browser plug-in when it released Java 7 Update 10 on December 11, 2012”.
“Running unsigned application like this will be blocked in a future release because it is potentially unsafe and a security risk”.
For understanding these security issues, we need to clarify concepts related to “Java Security Model” which covers “unsigned applet”, “signed applet” and “self-signed applet:
Unsigned Applet: This kind of applet cannot access all system properties, local file system etc. This lacks security as applet is not signed. According to “Java 7 Update 10” (as stated above) user is warned just before using it.
Signed Applet: In this, applets are signed by a certificate which browser verifies using certificate authority server. On the successful verification of signature and on approval of user, this kind of applet gets more rights. It can do more tasks as compared to self-sign (discussed below) and unsigned applets (discussed above).
Self-Signed Applet: These applets are signed by developer and can also be considered as security concern. Java plug-in still gives warning on running self-sign applets because only developer guarantees the security of these applets.
For getting some more information regarding the above given concepts related to Applet Security Model, just refer to the following link. The difference is shown in the below given link with great explanation: http://www.mendoweb.be/blog/java-applets-unsigned-vs-self-signed-vs-signed/
To run the current project “AmitWebApplication”, just Click on “Run” after selecting “I accept the risk and want to run this app”. This step will run your Applet successfully:
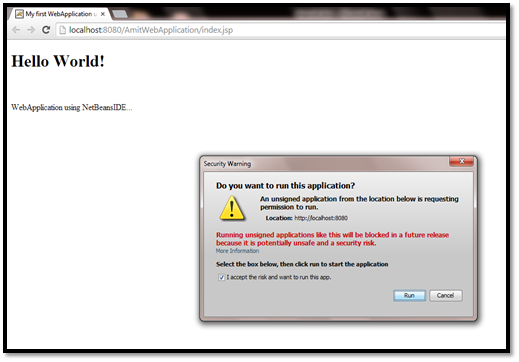
Figure 30: Select the box “I accept the risk and want to run this app”
The Applet from “AmitJavaApplication” can be seen here, in this way we can show our Applet on WebPage. The size(height, width) of the Applet can be changed in “index.jsp” by changing the applet tag:
<applet code="tutorial.me.AmitApplet" archive="AmitJavaApplication.jar" width="400" height="350">

</applet>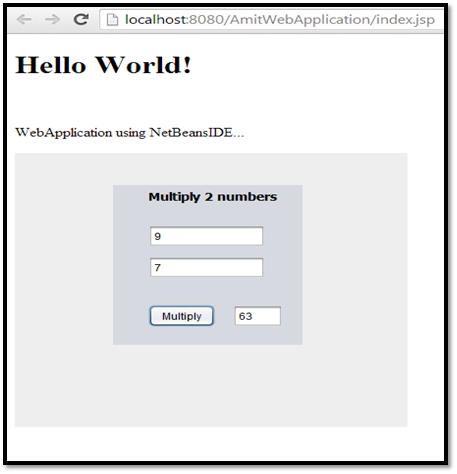
Figure 31: Applet running successfully on JSP Page
Conclusion
Through this simple tutorial you should have got an idea about running programs in NetBeansIDE. My aim was to target NetBeansIDE users to help them in learning the following functionalities:
• How to start with NetBeans IDE
• How to run an Applet in NetBeansIDE
• Understanding Applet Security Model
• How to run Web Application in NetBeansIDE
• Embedding/Integrating your Applet in JSP page (Web Application).
Resources
These are the resources which can further help readers:
You can download the Applet and Web Application project here.
I hope you learned from this tutorial. I look forward to your comments below.
Frequently Asked Questions (FAQs) about Embedding Applet in Web Application
What is the purpose of embedding an applet in a web application?
Embedding an applet in a web application allows you to incorporate Java functionality into your website. This can be particularly useful for creating interactive features, such as games, animations, and calculators. Applets can also be used to process and display data in ways that are not possible with HTML alone. However, it’s important to note that applets require the Java Runtime Environment (JRE) to be installed on the user’s computer, and not all web browsers support applets.
How do I embed an applet in my web application?
To embed an applet in your web application, you need to use the
Why isn’t my applet displaying correctly in the web browser?
There could be several reasons why your applet isn’t displaying correctly. First, check that the Java Runtime Environment (JRE) is installed on the computer and that the web browser supports applets. Also, ensure that the applet class file is in the correct location and that the ‘code’ attribute in the
Can I use JavaScript to interact with an applet?
Yes, you can use JavaScript to interact with an applet. This is known as LiveConnect. With LiveConnect, you can call methods in an applet from JavaScript and vice versa. This can be useful for creating more complex interactions between the applet and the web page.
How can I debug my applet?
Debugging an applet can be a bit more challenging than debugging a standalone Java application because the applet runs within a web browser. However, you can use the Java Console to view debug information. To enable the Java Console, go to the Java Control Panel, select the Advanced tab, and under Java Console, select Show Console.
Are there any security considerations when using applets?
Yes, there are several security considerations when using applets. By default, applets run in a “sandbox” environment, which restricts what they can do. For example, an applet cannot access the file system of the computer it’s running on. However, it’s possible to sign an applet to give it more permissions, but this should be done with caution.
Can I use applets with HTML5?
No, the
How can I pass parameters to an applet?
You can pass parameters to an applet using the tag within the
Can I use applets in a responsive web design?
While it’s technically possible to use applets in a responsive web design, it can be challenging. The size of the applet is defined in the HTML code, and this does not automatically adjust to fit different screen sizes. Therefore, you may need to use JavaScript or CSS to adjust the size of the applet based on the screen size.
Are there any alternatives to using applets?
Yes, there are several alternatives to using applets. JavaScript, combined with HTML5 Canvas or SVG, can be used to create interactive web content. Additionally, technologies such as Flash and Silverlight can also be used, although these are becoming less popular due to lack of support in modern web browsers.
Amit Diwan is a founder at Studyopedia, who has taught more than a million engineers and professionals on the following technologies: Python, Java, Android, WordPress, Drupal, Magento, JavaScript, jQuery, HTML5, Bootstrap 4, etc.
